How to Choose Vacuum Insulated Panels for Walls
Choosing Vacuum Insulated Panels For Walls starts with a clear question: what must the wall achieve, and how much space can it spare? Vacuum insulation panels can provide strong thermal resistance in a slim profile, but their performance depends on careful design. A panel is not ordinary foam that can be cut casually on site. Its sealed envelope must remain intact.
Building-envelope researcher Thomas Tenpierik’s work highlights the importance of designing VIPs as part of a complete wall assembly. As an editorial paraphrase, not a verified verbatim quotation: “A panel’s insulation value matters only when the surrounding details protect it.” The edges deserve attention. So do joints, fixings, window reveals, and service penetrations. A tiny gap can become a meaningful thermal bridge.
Details matter.
Before comparing products, check declared thermal performance, dimensions, facing materials, and installation guidance. Then consider how the panels will meet framing, sheathing, and interior finishes. Ask suppliers how they handle damaged panels and whether replacement is practical. These questions can feel tedious. They are still important. Wall layouts often change during construction, and a rigid panel plan may not adapt neatly. This guide explains how to compare options, identify trade-offs, and coordinate panels with the rest of the wall. No single specification answers every project’s needs; climate, structure, workmanship, and available space all shape the decision.
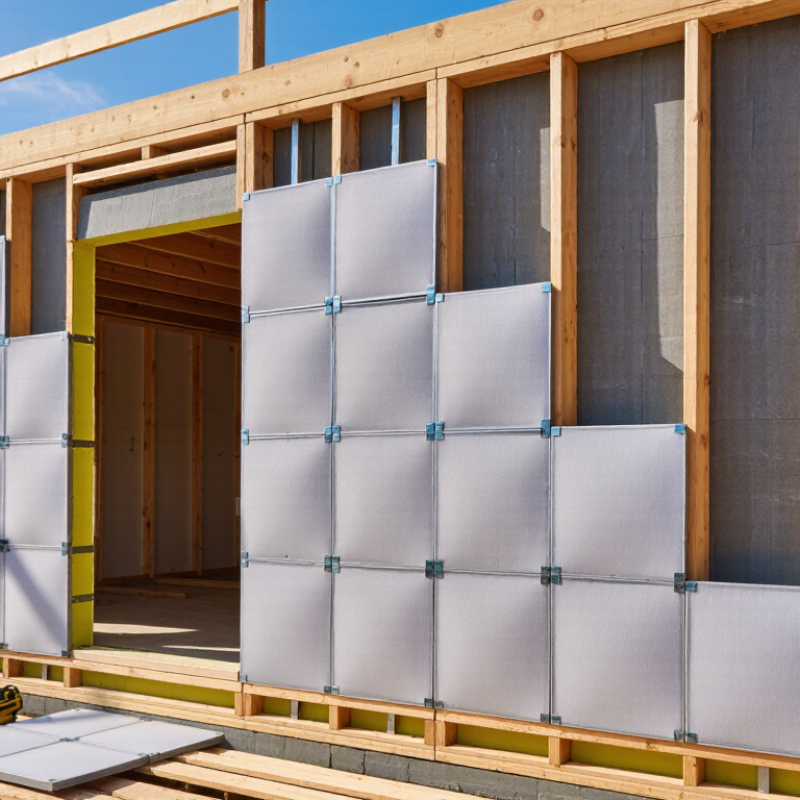
Understand How Vacuum Insulated Panels Work
Vacuum insulated panels work by reducing heat transfer through a porous core, commonly made from fumed silica. Air is removed from the core, and a barrier envelope helps keep it out. Less gas inside means less heat carried by air, but solid conduction and radiation do not disappear. The panel is highly insulating, not magic. The IEA Energy Conservation in Buildings and Community Systems Programme’s Annex 39, High Performance Thermal Insulation, reports center-of-panel thermal conductivity around 0.004–0.008 W/(m·K), depending on the panel. For comparison, that figure describes the panel center, not a finished wall.
The envelope is the vulnerable part. A puncture or damaged seal can let air enter and reduce performance, so panels cannot be cut to fit around a socket or pipe. At wall edges, joints and fasteners create thermal bridges; a narrow seam can matter more than its size suggests. That is easy to overlook on a neat drawing. Check tested values, dimensions, edge details, and installation guidance before choosing a panel. I would also ask how the manufacturer measures aged performance, not just the initial figure. Small gaps on site are real, and a perfect layout rarely survives every renovation.
Assess Wall Conditions and Insulation Requirements
Before selecting vacuum insulated panels, inspect the wall as it is, not as drawings suggest. Look for damp patches, peeling paint, cracked plaster, and signs of water entry around windows. A panel will not solve those problems. Dry the wall and address leaks before covering it.
Check whether the surface is flat and stable. Measure around corners, sockets, pipes, and window reveals; these details can leave awkward gaps. Vacuum panels should not be cut or punctured, so accurate dimensions matter. Even a small unplanned opening can reduce performance. It is easy to focus on the advertised thermal value and overlook these edges. That oversight can be costly.
Set an insulation target based on the building’s climate, current wall construction, and available thickness. Compare the panel’s stated thermal resistance with the full wall assembly, including joints and fixings. Ask a qualified building professional to review moisture risks and thermal bridges, especially on older masonry. Small details matter. I would also leave room for uncertainty: hidden damp or uneven layers may only become clear once work begins. A careful site assessment helps prevent rushed changes.
Compare Panel Thickness, Thermal Performance, and Size
Choose thickness by comparing declared thermal conductivity, not the panel’s appearance. The IEA EBC Annex 39 report gives fresh vacuum insulation panel core conductivity near 0.004 W/m·K. At that value, a 20 mm panel provides about R-5 m²·K/W through its center. That is a strong result in a thin wall build-up. But it is not the whole-wall value. Edges, joints, fixings, and aging can reduce performance. Edges matter. I would check the manufacturer’s declared design value and tested assembly data, not rely on the best laboratory figure.
Panel size is just as important. Large panels mean fewer joints, but awkward openings can force cuts or narrow infill pieces. Vacuum panels generally cannot be trimmed on site without losing their vacuum. The IEA report also highlights edge effects, so map panel joints around windows, corners, and wall ties before setting out the wall. A simple elevation drawing can expose gaps early. Check the actual dimensions, thickness tolerance, and available sizes against the wall grid. ASTM C1484 provides a specification framework for vacuum insulation panels, but project details still need review. A neat panel schedule may look convincing; real walls are rarely that neat.
How to Choose Vacuum Insulated Panels for Walls — Compare Panel Thickness, Thermal Performance, and Size
How to read these figures: The illustrative R-values are calculated using a center-of-panel thermal conductivity of 0.006 W/(m·K): R = thickness ÷ conductivity. Actual vacuum insulated panel performance varies by product, temperature, ageing, and test method. The figures exclude edge effects, joints, fixings, and the rest of the wall assembly; whole-wall thermal performance will therefore differ. Panel formats shown are examples, not universal standard sizes. Confirm available dimensions and declared design values with the supplier, and do not cut or puncture a panel.
Check Moisture Resistance, Fire Safety, and Durability
Moisture resistance begins with the panel facing and the joints, not just the insulation core. Ask for test data on water-vapor transmission and edge performance, then compare it with your wall’s climate and exposure. A panel may resist ordinary humidity but still suffer if rainwater enters a joint or condensation collects behind the finish. Edges matter. Check how seams, window openings, and service penetrations will be sealed. Do not assume a vacuum insulated panel is waterproof; the complete wall assembly needs a reliable drainage and drying strategy. On site, keep panels dry and protected from sharp tools.
Fire safety depends on the panel materials and the wall assembly around them. Request fire-test documentation for the actual construction, including facings, joints, and any protective layers. A result for one configuration may not apply to another. Verify that the proposed assembly meets local requirements, and ask how installers should handle gaps around openings.
Durability deserves equal attention. The vacuum envelope can be damaged by punctures, drilling, or rough handling, so panels generally cannot be cut to fit. Plan dimensions carefully and confirm how damaged units can be replaced. I would not choose by thermal figures alone: those numbers can look reassuring, while installation details decide whether performance lasts. No datasheet captures every site condition. Keep that uncertainty in the decision.
Plan Installation, Sealing, and Long-Term Maintenance
Choosing vacuum insulated panels for walls starts with the installation plan, not just the advertised thermal value. Measure each wall bay and mark window reveals, corners, outlets, and service routes before ordering. The panels offer high insulation in a slim profile, but cutting or puncturing the core can reduce performance. Keep dimensions accurate. Check that the substrate is dry, sound, and reasonably even; uneven areas can create gaps or stress panel facings. Plan how the air and vapor control layers will connect at floors, ceilings, and openings. Follow the panel system’s installation details, including specified edge protection and joint materials.
During installation, dry-fit panels and check every edge before sealing. Use compatible tapes or sealants, and press joints firmly without damaging the facing. Small gaps matter. Avoid treating foam or caulk as a substitute for a continuous, carefully planned seal. This step is easy to underestimate. After the wall is finished, keep installation records and photos, since the panels will be hidden from view. Periodically inspect accessible joints, window surrounds, and nearby finishes for loose seals, water stains, or unusual dampness. Avoid drilling into insulated areas for shelves or cables unless the fixing method is planned. If a panel may be damaged or wet, get the assembly assessed before covering or patching it; a neat surface does not always reveal what is happening behind it.